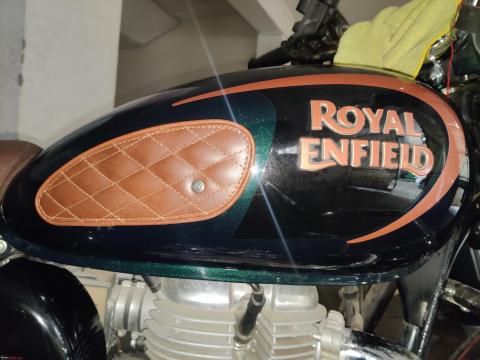
Royal Enfield Classic 350: How to install an aftermarket tank pad
One caveat is that the company went with a non-foam tape. Which results in an ugly-looking gap for the unadhered part.
BHPian DDISClatters recently shared this with other enthusiasts.
I recently bought home a Royal Enfield Classic 350. While an ownership thread is in the works, this thread focuses on the DIY performed to change the boring black thigh pads that come from the factory.
While scrolling Instagram casually, I stumbled upon this offering from a brand called Trip Machine Company. These guys specialize in leather accessories for bikes and have some great offerings to give your bike that retro touch.
Buying experience
For some reason, the company has photos of this thigh pad on every bike except the RE classic. I suspect this is due to the shape of the tank of RE Classic.
Having no picture to reference made me a bit skeptical about buying the product. It comes in 2 sizes and was unsure which one would fit better on my bike. Luckily, the company has a store/café right next to Throttle Shrottle on Gurgaon Faridabad Road road (Delhi-based folks would know).
The store has all the products on display and is quite aesthetic. They have custom RE’s on display too and is an overall delightful place for a motorhead. I would also recommend trying their 900CC Iced Latte. The staff was cooperative enough and thus, got the opportunity to place both sizes against my bike and compare:
While the larger tank pad fills the space nicely, it would have posed problems with sticking as the tank curves quite a bit in that area. The small size fits the bill well and hence I picked it. This cost me Rs. 1699/-
Close-up of the product below. Comes packed in a slim box with a Thank You note and sticker:
Installation
This can be divided into three sub-sections:
- Removing the old pads
- Cleaning up
- Installing new pads
Removing the old pads
This is the most crucial step of this DIY. This is similar to prepping the body prior to a paint job. Mess this step up and the time and efforts multiply.
1) First things first, give the tank a good rinse with water and make sure you’re working with a clean, dust-free area.
2) Heat up the tank pads. I used a hairdryer and it worked reasonably well. Don’t worry about heating the paint too much. Just go around in circular motions for a max of 5 minutes and you’re ready for the next step.
3) Start prying the pad from the top left/right corner(depending on the side) and work your way back. Once you pry the pad about the width of an index finger, turn on the hairdryer and point it into the void created by the peeled-up pad. This would help heat the glue of section your peeling and make the process super easy. Just go on pulling the pad slow and easy.
Once the above steps are successfully completed, the area should look like this;
However, if you see this after removing the pad, tell your family you’ll see them directly at dinnertime:
Having such an outcome can be a result of:
- Gum bonding too well over time depending on the bike’s age.
- One rushing through the heating process. Make sure to heat up the whole pad and not just the edges. The residue you see above is from the mid section of the pad.
- Pulling the pad too fast.
This brings me to the next step in this DIY.
Cleaning up
Disclaimer: This step will take your finger strength up to the next level. Practice with your own caution. Results may include driving your partner crazy. This of course due to gaining the ability to type on TBHP endlessly and hence spending all the time here.
Note for the moderator – Thank you for reviewing my post. Apologies if the above statement violates any policy. Just a light-hearted joke. I am aware we have people from all age groups visiting the platform and request you kindly moderate it as you deem necessary.
What works?
I spent nearly 1.5 hours cleaning out the residue. I vest my trust in three products when it comes to removing residue or stains from paintwork; WD40, Diluted Isopropyl Alcohol (70-80% IPA content) and finally heat.
Using IPA is the last resort as it has the highest chance of damaging the clear coat among the three. WD40 and heat are your bestfriends. Use them in tandem while rubbing on the residue with a microfiber cloth and you should be able to get rid of the residue.
Please leave WD40 on the stain for 5 minutes for it loosed the gum. In my case, I had to eventually take help from IPA which is unfortunate.
I’ll take on my point earlier about not worrying about using too much heat now. If you don’t end up with a clean tank after removing the pads, you’d have to use chemicals like IPA and WD40 along with endless buffing with a microfiber. This can and will leave you with swirl marks in that area and the two chemicals can even eat into the Clear Coat.
Thus, I recommend taking liberty with heat as this way, your risk of damaging the paint minimizes quite a bit.
Once all the residue is off, make sure to clean up the tank thoroughly. WD40 would not let the new tank pads stick properly.
Installing the new pads
This step is pretty straightforward. The pads come with strong 3M double-sided tape pre-applied.
Thank you for reading through. Here are the final results:
One caveat is that the company went with a non-foam tape. Which results in an ugly-looking gap for the unadhered part. This being a universal product, a foam-based tape would have suited it better.
Read BHPian comments for more insights and information.
Source: Read Full Article


