Installing a rear cabin roof light in 3 cars – Ignis, Polo and Nexon
I got a Maruti WagonR front roof / S-Cross rear cabin lamp from Boodmo. Good alternatives are also available – like the cabin light of Tata Punch / Altroz.
BHPian Reinhard recently shared this with other enthusiasts.
Adding Roof Light To Rear Cabin Area Of Ignis, Polo & Nexon
A few months pass & then there’s a DIY itch with the car. Suddenly something starts to feel missing, regardless of whether it’s really missing or not! Here we go again.
So the title is clear enough I think to set the context. All 3 cars I own are really just small hatchbacks of various lengths. Yet – the makers of all 3 have been very smart in installing the sole cabin illumination in the front, near the IRVM. Everything in the back should remain a dark secret they said. So far – the Nexon has a detachable LED with USB charging installed on the C pillar within reach of my son from his child seat (its documented in the Nexon ownership thread). But then – something permanent, without LiIon battery & directly linked to the front lamp / doors – is definitely better. And since it’s needed in 2 other cars – I decided to install it in the Nexon as well. The cleaner the better. Let there be light!
Warning – if you don’t have the cold heart needed to use a cutter and literally chop away parts of your beloved car – this is where you close the tab & don’t read further. Some very cruel blade work will be needed for this project & you need to have that cold blood.
As usual, Japanese efficiency and cheap modularity to the rescue. Sourced a WagonR front roof / SCross rear cabin lamp from Boodmo (3Nos) for this purpose. There are good alternatives available – like the cabin light of Tata Punch / Altroz. They are better finished & come with an LED light. But then – they cost 4 times as much.
This is the part that I sourced from Boodmo – Suzuki Cabin Roof light
Part Number is – 36210 M 55K00-6GS
As usually is the case – the lamp does have a cheap halogen bulb included – but does not include the connector we need, to attach the wiring. And it’s a typical non-standard connector that’s hard to source online. If you want to source it from Boodmo – the options are roof harnesses of other cars like Swift / Baleno (In my case it was rather costly to procure 3 especially since Boodmo stupidly multiplies shipping charges for every added quantity of the same item in the order). The easiest option is to buy the Swift roof harness. It costs around 205 INR + shipping. Boodmo.com.
The use of this harness is just to get the suitable connector and 2 wires of suitable length pre-crimped. Most parts of the harness other than the roof lamp wiring, we’ll anyway have to cut away.
I luckily stumbled onto KARDIY once on YouTube and saw that they are stocking the connectors with small 3-wire pig-tail, available for sale via their Whatsapp catalogue. Checked with them & they had it in stock. INR 100+ shipping per unit. That’s really well priced. The gentleman is kind & I liked doing business. Added to contacts for the future! We’ll use a set of Polycab wires covered in the shield to extend the pigtails to the desired power sources.
We’ll go one car at a time in the next posts. The steps are pretty much the same –
- Make a cut-out in the roof liner while praying that you don’t cut it more than needed. You get just 1 shot at getting it right.
- Route the wiring harness from it to the front cabin lamp OR desired fuse tap / other power source as per car.
- Test that it works, put the lamp into the cut-out firmly, close all opened panels.
For harness preparation, temperature & fireproofing, sound deadening you may also want to have:
- Good quality copper wires of 3 different colours. These really have to be heat / fire resistant. Remember – they’ll run under the roof / inside the pillars. Areas that get extremely hot when the car is parked under the Sun. I used 1sq mm Polycab copper wires (that we usually use for household wiring upto 10 Amp).
- Automotive tape. Amazon.in – Automotive tape
- Larger LED lights to replace the existing yellow halogen. Amazon.in – LED replacement roof bulb
- Some sponge / foam pieces – mainly on the inner top side of the lamp, to avoid any fouling/rattling/scratching with the metal roof panel above the fabric roof liner.
- Double sided tape pieces.
- Couple of 10 Amp (Check the exact rating in your car’s user manual’s fuse specifications for cabin fuse) blade fuses (of appropriate type – micro/mini/standard) for replacement in case you accidentally blow out the existing fuse while wiring. These are readily available at car/motorcycle spare part shops or on Amazon.in.
So since the project involves cutting away roof liner parts, something that is irreversible (especially painful if you get it wrong), it had to be the Suzuki in the garage that was the guinea pig! Can’t imagine messing up something on the Polo/Nexon, would have to be taken to the ER with spasms. We’ll be doing a pathfinder installation with the Ignis, learning as we go, & fine tuning the process as we move to the next 2 cars.
Jump To Car:
- Suzuki Ignis
- Volkswagen Polo
- Tata Nexon
About the Suzuki Light –


- The part quality really is bad. We won’t complain too much about it, because it is also very cheap to purchase one! Can’t expect much for this price in today’s world.
- It comes with a halogen festoon bulb. I have replaced those with LED ones of course, for more and better lighting. Here it is, with a 3M tape that I applied on the back, to stick it safely inside the dome light, to avoid rattles.

- It shows the Japanese efficiency + Indian cost-cutting literally everywhere in its build. For example – the rear is totally exposed, with metal contact plates that carry current open to the air. If they touch a metal-like roof outer metal sheet (which does touch in the Ignis, but not in Nexon & Polo) – you’ll have short contacts and a blown cabin lamp fuse! Marked by blue boxes in this image.
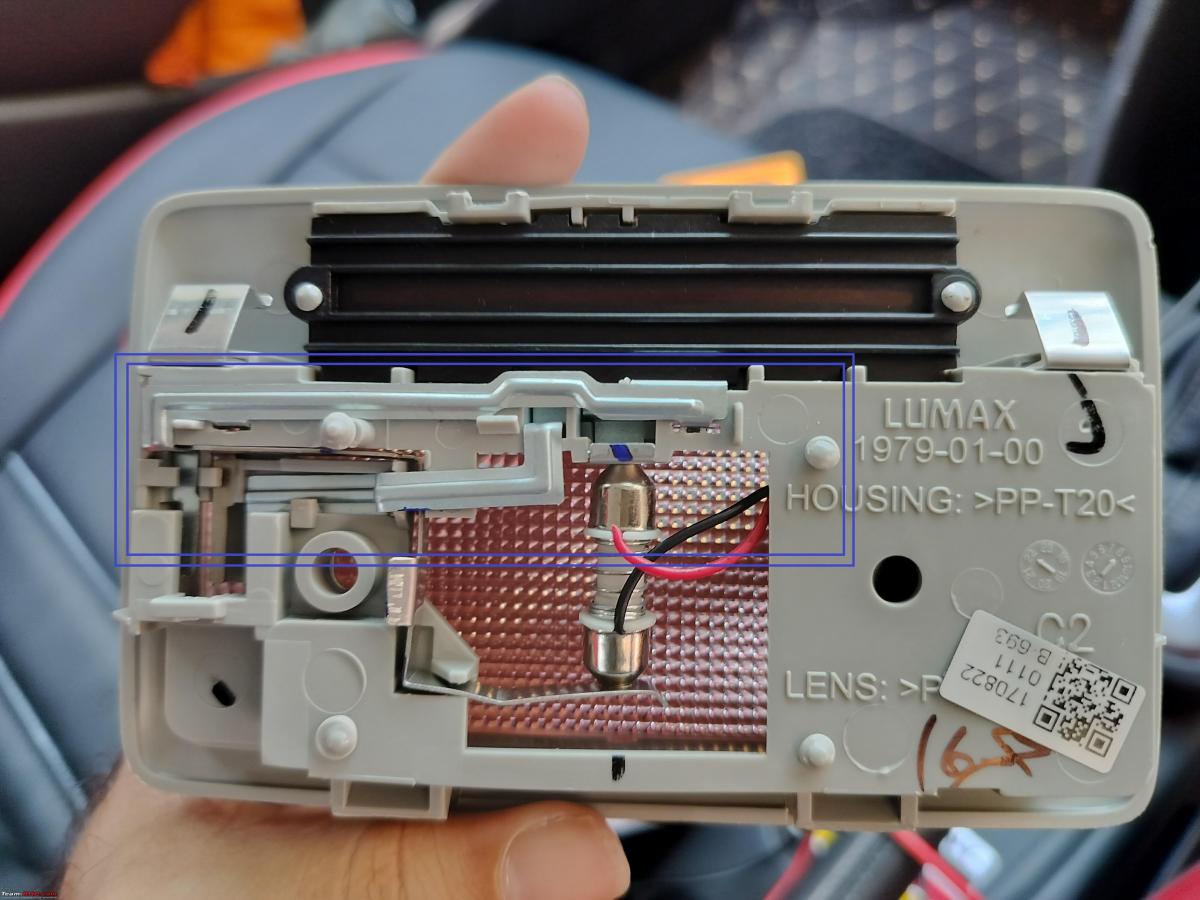
- The only way by which Suzuki has attempted to avoid this short circuit – is a 2 mm tall dimple at 2-3 places on the back of the lamp assembly, which basically creates a small gap with the roof! But then – they are of different heights and if retained, result in the lamp sitting in a rather crooked position! Marked by the red & blue boxes in this image. Note that the one marked by red boxes is taller, and also has a pointy head. If you retain this – please do not push the lamp too hard into the roof, especially in a Suzuki car. It will create a nice dimple outward on the roof sheet metal, immediately. I had a hard time “undoing” it afterwards.

- Okay, that aside – the functionality is good. Has the usually needed ON & DOOR positions along with OFF. The diffuser is good & spreads light very well all around.
- The control switch is a slider & not a push-button action (like in the one for the Brezza or Altroz/Punch). This I feel is better since it is a retrofit in our cars. A push action would put more strain on our cut-out roof liner edges, which don’t have any metal borders for strength.
- The results are outstanding & more than worth the effort & money spent. Rear part of the cabin is so conveniently well-illuminated, that it is really impossible to imagine how we lived without the light earlier! If you have kids / anyone else travelling in your car regularly in the rear seat – this lamp is a very useful addition. Definitely a better investment than them chrome kits!
Suzuki Ignis
So, without further ado, let’s get on with the experiment cum learning exercise with the Ignis, hopefully in a step-by-step manner of documentation.
- Open the stock cabin lamp in the front. Use a trim removal spatula to pull it down, from the edge near the mic / control switch. i.e. the edge nearest to us. It’s simply held in place by metal bendy plates & will come out easily.


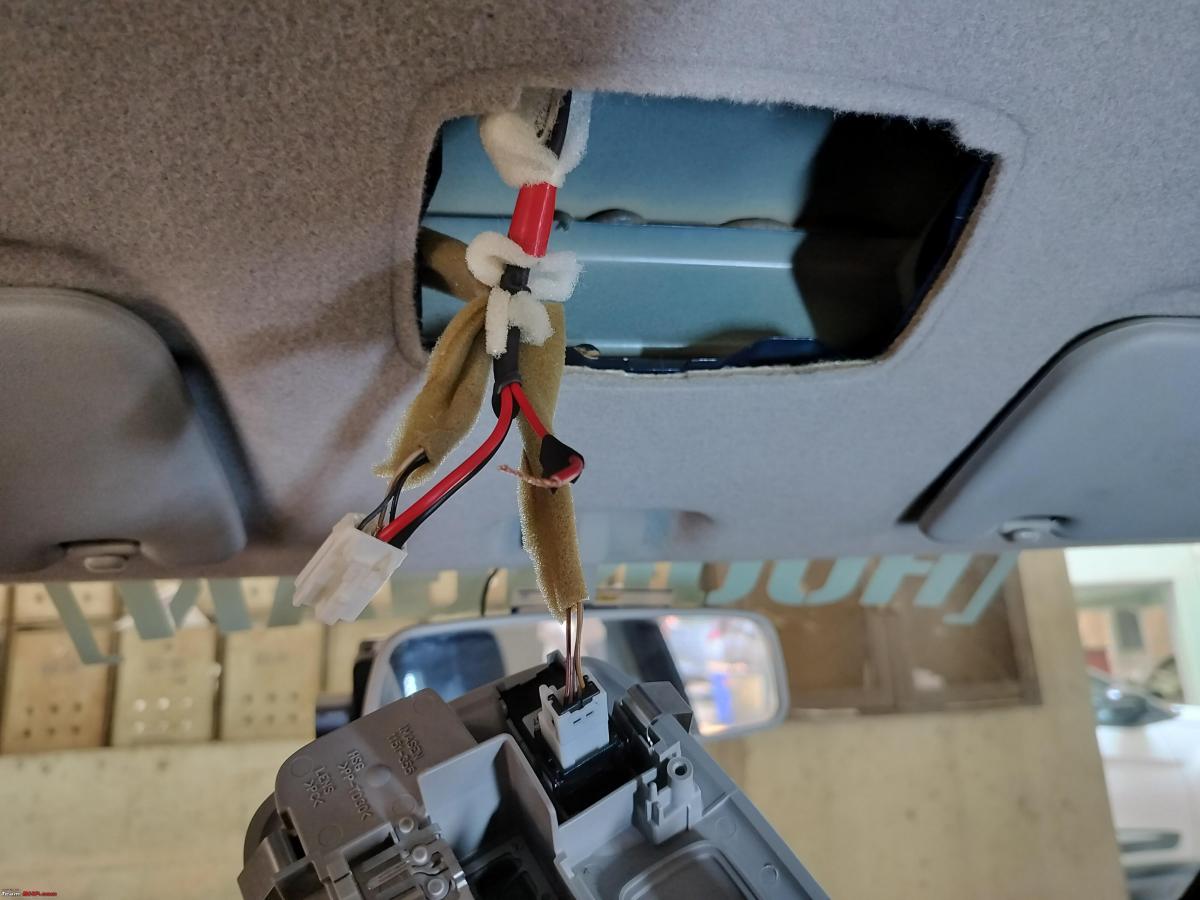
- Now – one of the connectors is for the onboard mic for phone, and the other is for the roof lamp. I have marked them in the image below. Also marked – are the purposes of the 3 wires in the connector. Disconnect both these and keep the stock lamp aside for now. Otherwise, it keeps hanging by the really thin wires.

- Now before doing any actual modifications to the roof-liner / wiring – we will test that the light & wiring harness that we procured, work. Just attach the pigtail to the lamp, and strip open the ends of the pigtail to expose copper strands.
- Also marked in the image below – are the purposes of the 3 wires in the new pigtail.
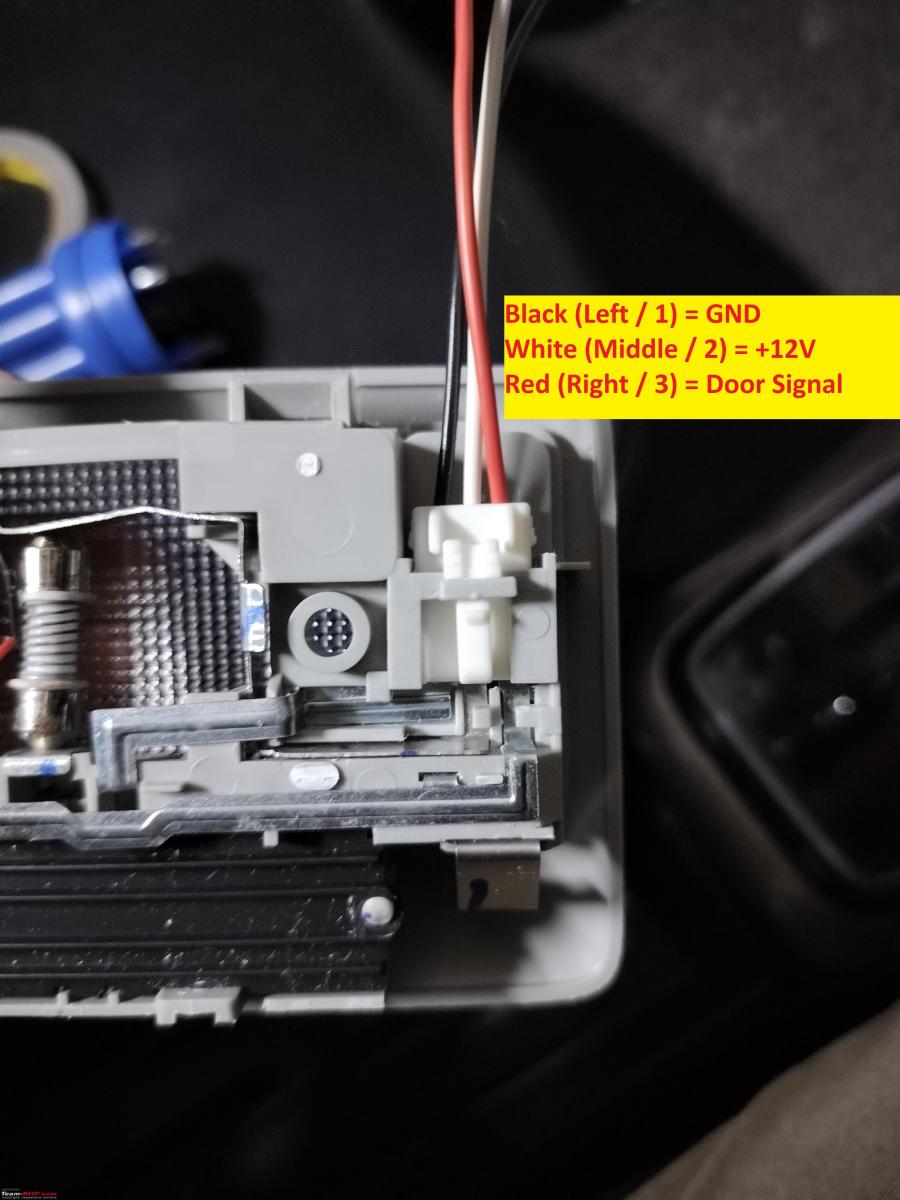
- Just take the lamp to the car and connect the GND to GND, +12V to +12V and Door signal to Door signal – from the new pigtail to the stock connector.
- Now test that the lamp’s 3-position switch works as expected in OFF-DOOR-ON positions. Et voila!

- Thanks to the negligible space between the liner and the outer roof sheet – I cut away all 3 plastic protrusions on the backside of the lamp & pasted a cardboard sheet on its back with FeviBond for electric insulation. Apologies, forgot to take a picture of this.
- Now that it works as expected – we will proceed to make a cut-out in the roof liner to install the lamp. It’s a really simple and yet painful process.
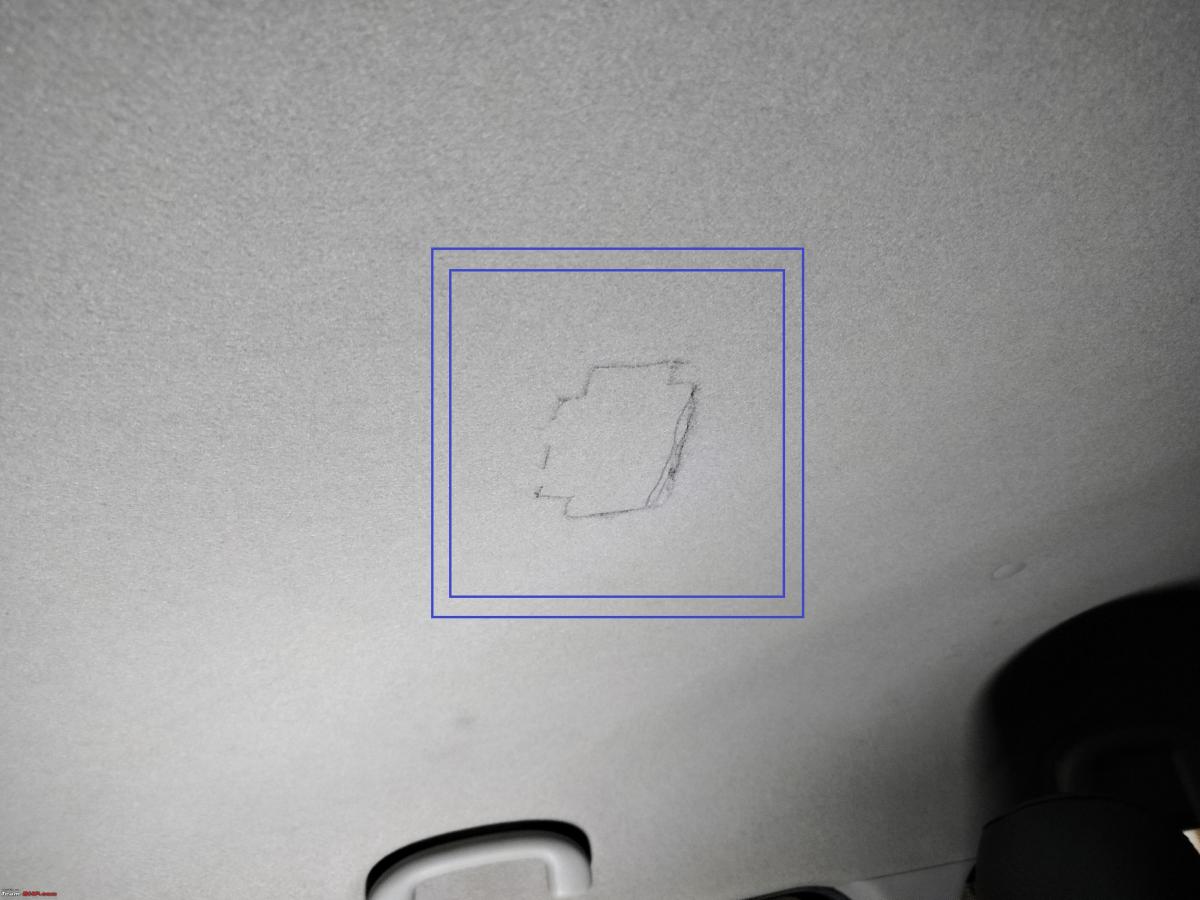
- Get in the rear seat of the car. With a tape measure OR with just your visual referencing skills, identify the best central part of the roof to install the lamp. Hold it parallel to the windshield / stock lamp / horizontal metal band inside the roof liner if there is one. And now – simply mark the inside border of the lamp’s rear, by a pencil on the roof liner. At least I did it this way. You can be more sophisticated and prepare a stencil / template on a blank paper, and use that to mark the edges then on the roof.
- Review your marked area as many times as it takes for you to be 100% sure that it is well-aligned and not larger than what it should be. A smaller cut-out is fine, as you can still widen it later. If you cut it too large – you are done for. The lamp won’t stay secured in it & in the worst case, you are looking at replacing the roof-liner altogether! Look from all angles, from outside the car, from the boot hatch, and from the front seats. Be sure that it is well aligned.
- Now simply take a pointy-tip paper cutter from your stationary bin & start cutting away along your marking carefully but ruthlessly. The Ignis’ (and in general Suzuki’s roof liner is pretty mediocre quality. It tries its best to just fall apart! Also note – there is nothing above the liner. It’s direct roof sheet metal. So be careful not to damage / deform the metal by applying too much pressure on the cutter / knife.
- Once the cut is complete, take the cut-out away, and see how your lamp fits. It took me 3 more attempts to widen the cut-out to perfect size, as I had intentionally marked it smaller by a few mm & had cut on the inner edge of the marking.

- Now – check how well the lamp fits. Should be good!

- Now with this – we’ll proceed to prepare the harness. Simply estimate / measure the distance between the 2 lamps now. We will prepare a harness of total length which is about 6 inches longer than this distance (for working & error margin).
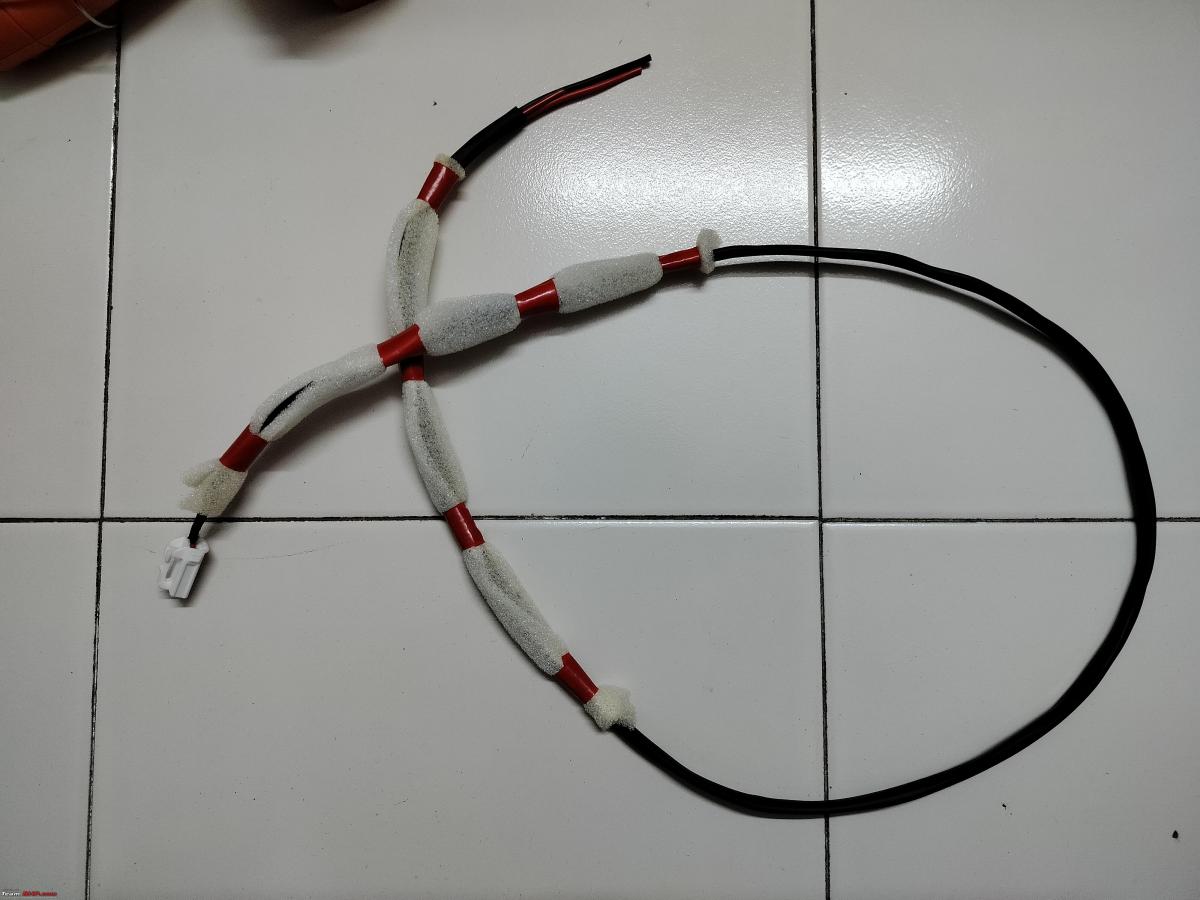
- Solder 3 high quality (I used Polycab 1sqmm copper wires as usual) to the 3 wires from the new pigtail, with proper flux, and good quality solder. It’s best to use wires of the same 3 colours as the one you have in the pigtail. I did this on a day when all hardware stores were closed & I used the existing 2 wires at my home. Which meant I had 1 black & 2 red wires in this car. Marked one of the wires with a black tape on the other end, for easy identification afterwards. Cover the solder connections for all 3, using good shrink tubes for safe long term insulation.

- Cover the pigtail from the connector upto the solder joints with good-quality automotive tape (Or the entire length of the new harness, no problem).

- Cover the rest of the 3-wire length, with a good quality shrink tube cover & shrink it using a heat gun, just keeping an inch or two of the wires exposed on the other end.

- Now – I used a waste sponge sheet from a t-shirt packing, to cut pieces and wrap them around the harness, for dampening and cushioning. This will keep the harness snugly in place inside the roof liner & will also ensure there are no rattles / vibrations during driving in future. Intentionally kept the central part uncovered, as there is a beam in the Ignis that pushes snugly against the roof liner near the driver’s head. In that part – the roof liner and the beam – hold the harness tightly in place, and it doesn’t need additional sponge / foam here.
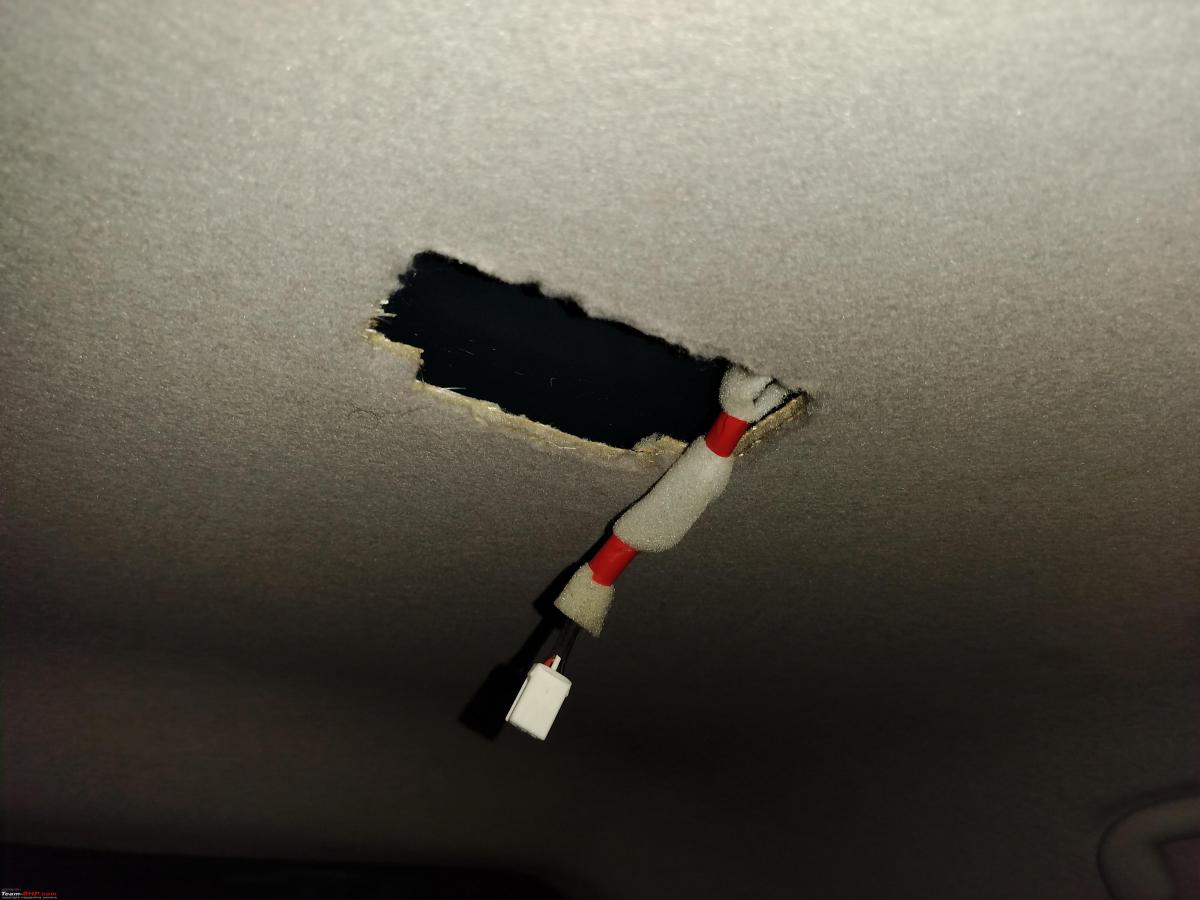
- And now we go back to the car. Simply push the open ends of the new harness into the roof liner from the new cut-out in the rear part of the cabin that we made. Gently keep the roof liner pulled down to create enough space for the wire to slide in. Keep pushing in, and eventually, you’ll be able to find it come out around the front roof lamp. Quite an easy step this.

- Now – use a needle / pin-remover tool’s pin, to take out 1 connector pin at a time from the stock coupler.


- And – connect its appropriate partner from the new harness safely inside the pin using existing gaps/holes. One at a time, complete this connection & push the pin back in place & then pull the next one out. Be very careful in this step. In case you short wrong pins – you’ll blow up the cabin-lamp fuse, and the fuse box in the Ignis, is placed in a really inhumane place.
Here is a photo with 2 pins done & one pending.
- With all 3 pins done, secure the new and stock harnesses together properly with zip ties or automotive tapes for safety and long-lasting fitment.
- Connect both the front lamp’s connectors back into place & test the front as well as rear lamps once for operations in ON and DOOR positions. All working, push both lamps carefully into their places & we are done!
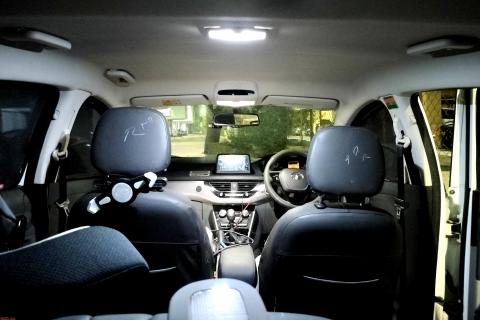
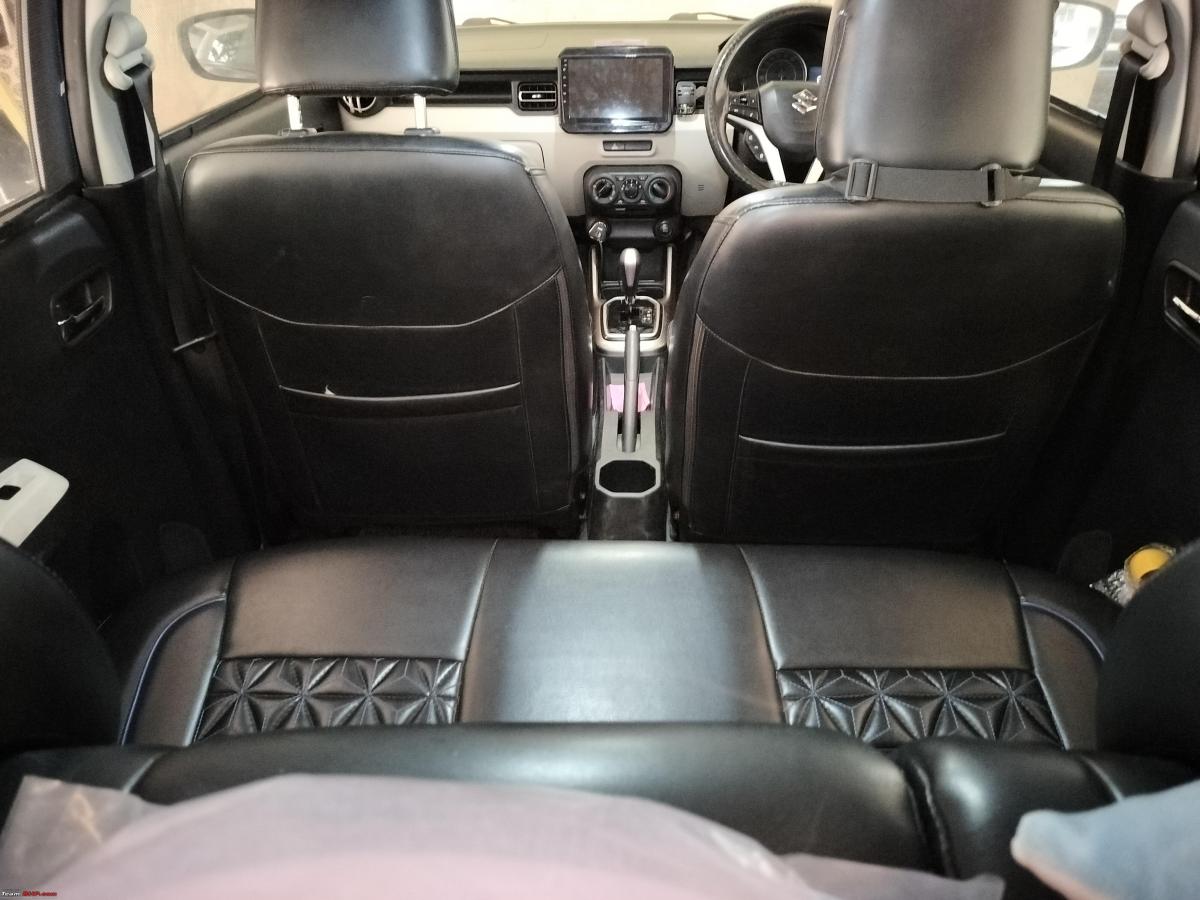
- Here are some pictures taken at the end of the process, for overall positioning, lighting test & comparison of BEFORE and AFTER lighting in the rear part of the cabin –


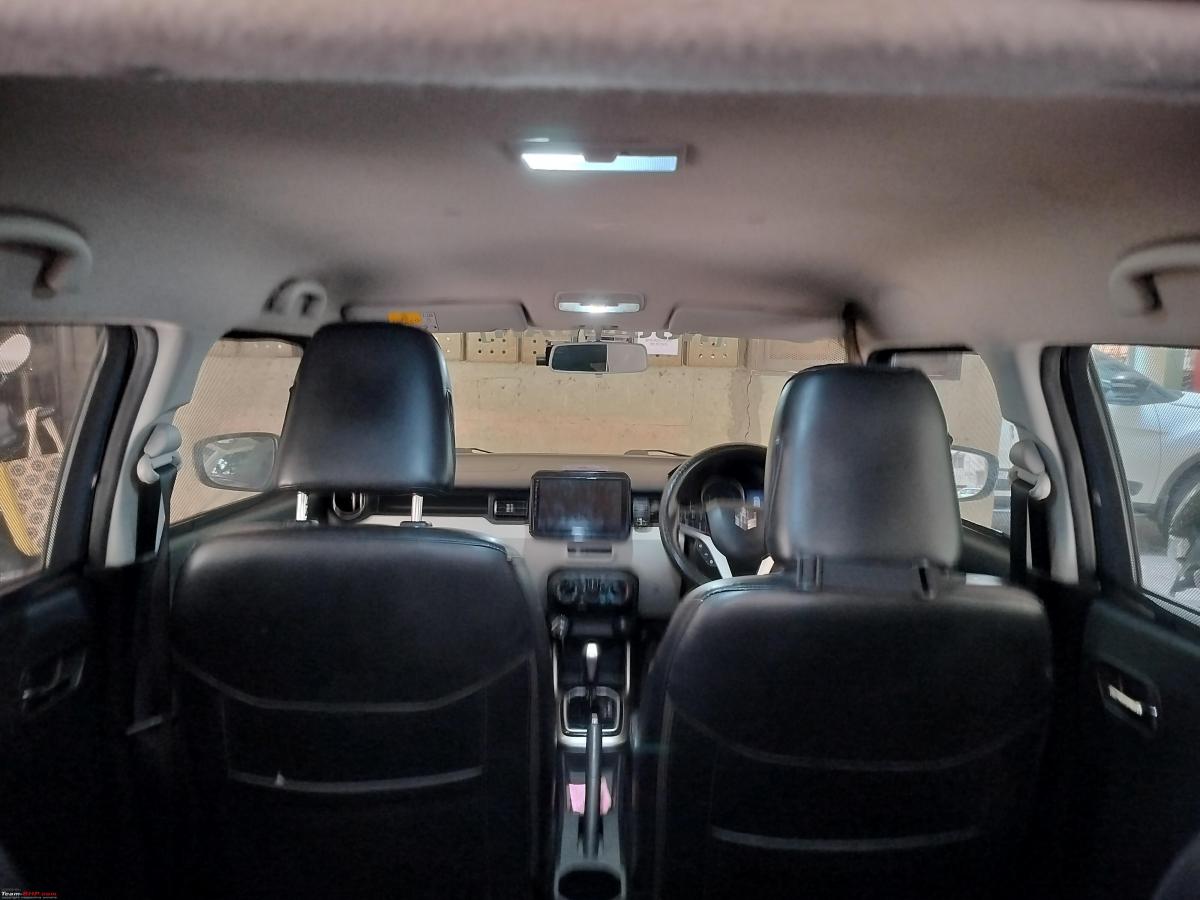
BEFORE – (Taken simply by switching off the new lamp)
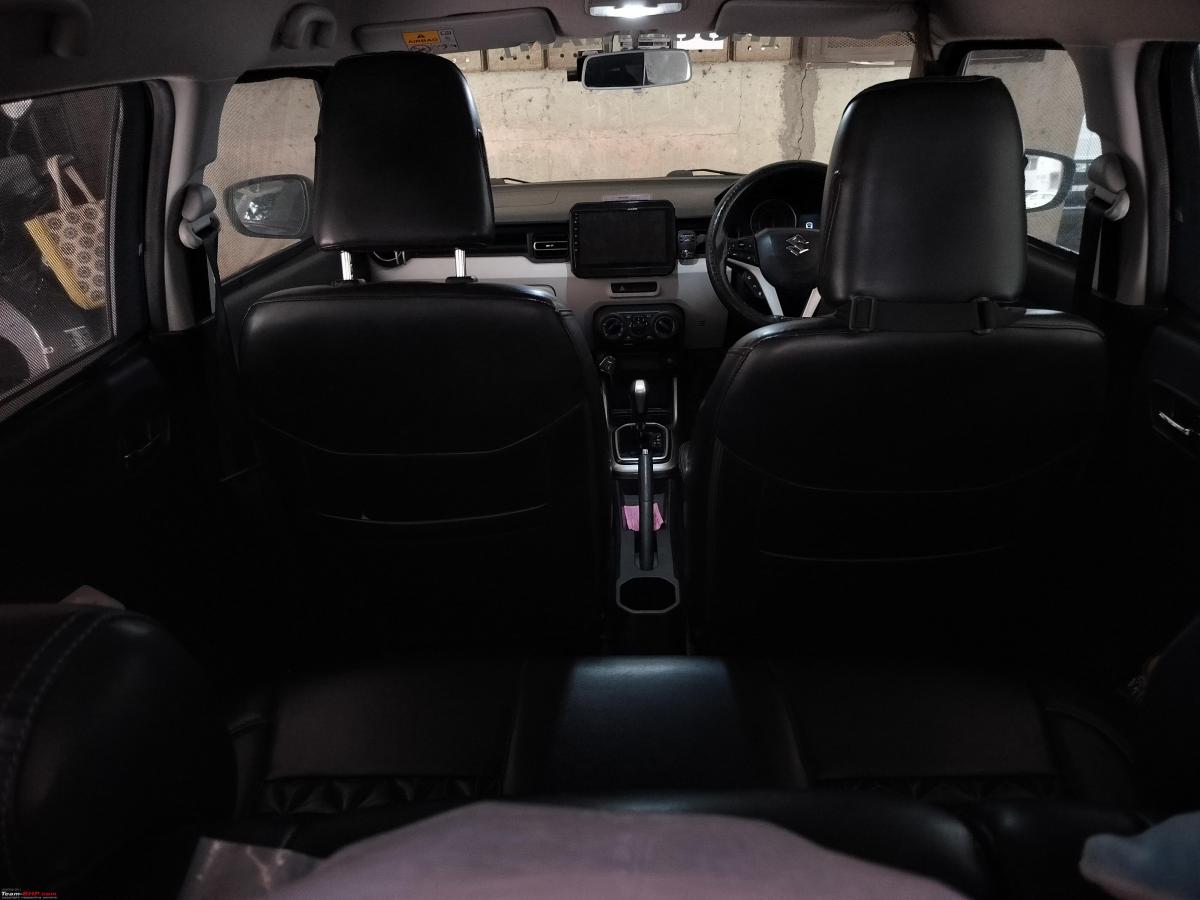
AFTER – (With the new lamp also ON with door position)
- Eventually, if you want – you can apply a few drops of FeviQuick / FeviBond / Silicone sealant inside the edges of the cabin lamp, to stick it steady to the roof-liner. I haven’t done so yet, and the built-in spring clips are holding it in place alright.
That’s it! The Ignis project is done & we have learned what it takes to do this. On towards the Polo now.
Continue reading about Reinhard’s DIY experience for BHPian comments, insights and more information.
Source: Read Full Article